





Adobe Acrobat 2020 is a one-time purchase PDF editor for Windows that lets you create, edit, sign, and protect PDF files. This guide shows you exactly how to install Adobe Acrobat 2020 on Windows 10 and Windows 11 using the serial number sent to your email. The whole process takes about ten minutes, and you don’t need any technical experience — just follow the steps below, each with a screenshot.
Ready? Make sure you have everything in the checklist below before you begin.
System and License Checklist
Confirm the supported Windows version, available storage, administrator access, and the license or installer supplied for Acrobat 2020. Close Office applications and back up custom Acrobat settings before removing an older version.
Before you start, make sure you have:
- Download Adobe Acrobat 2020 from the download link provided in your license email
- Have your serial number ready (it’s in the same order email)
- Remove any other Adobe Acrobat program already installed on your computer to avoid conflicts
Remove Conflicting Acrobat Versions
Uninstall damaged or conflicting Acrobat installations before running the new setup. Restart Windows and use the dedicated cleanup procedure only if the standard uninstaller fails. Do not remove shared Adobe files when other Adobe products remain installed.
If you have not purchased it yet, get an Adobe Acrobat Pro 2020 lifetime license before starting the installation.
How to Install Acrobat Pro 2020
Step 1 — Download Adobe Acrobat 2020 from your email link
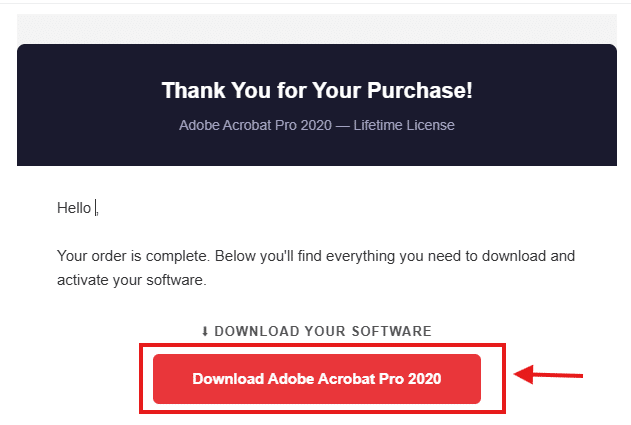
Open the order email we sent you and click the “Download Adobe Acrobat Pro 2020” button. The file will be saved to your computer’s Downloads folder. Wait for the download to finish completely before moving to the next step.
Step 2 — Extract the zip folder
In your Downloads folder, find the AdobeAcrobatPro2020 file. Right-click it and choose Extract All…, then pick a location and confirm.

Step 3 — Run the Setup file
Open the extracted folder and go to AcrobatPro › Adobe Acrobat. Double-click Setup (the file with the “Application” type — not the small setup config file).

Step 4 — Enter your serial number
Run the installer with administrator permission, select the intended installation options, and wait for setup to finish before opening Acrobat. Keep the device connected to the internet if license verification requires it.
When the installer opens, select “I have a serial number”. Copy the serial from your email and paste it into the Serial Number box. Uncheck the Adobe Genuine Service (AGS) option, then click Install.

Step 5 — Wait for the installation to finish
Setup will start copying files. This usually takes a few minutes — leave the window open and don’t restart your computer until it’s done.

Step 6 — Launch Acrobat
When you see “Setup Completed”, click Launch Now. On first launch you may be asked to accept the license agreement and activate the product — just follow the on-screen prompts.

Activate and Verify the Installation
Open Acrobat, review the version information, and confirm the license status. Test opening, editing, saving, and printing a PDF. A successful installation should not repeatedly display sign-in or activation prompts.
Tip: Always copy and paste your serial number instead of typing it. This avoids mistakes with similar characters like
0(zero) andO(letter O).
Frequently Asked Questions
Where do I find my serial number?
It’s in your order confirmation email, shown as your license key. If you can’t find it, search your inbox for the order and check the spam or promotions folders.
Where does the download go?
When you click the download button in your email, the file is saved to your computer’s Downloads folder by default. Open that folder to find the AdobeAcrobatPro2020 file.
Why should I uncheck Adobe Genuine Service?
Adobe Genuine Service (AGS) runs background checks and can show repeated pop-ups. Leaving it unchecked keeps the installation lighter and avoids those notifications.
My serial number isn’t accepted.
Check there are no extra spaces and that the serial matches your email exactly. If it still fails, make sure that you have extracted the zip folder before running setup.
Common Installation Problems
Installer will not start
Confirm that the download has finished completely and that the installer was extracted before running it. Restart Windows, then run the setup file with administrator permission.
An older Acrobat version is detected
Uninstall the conflicting Acrobat installation and restart Windows before trying again. If the standard uninstall process fails or remnants prevent setup from continuing, follow the complete Acrobat removal guide before reinstalling.
Insufficient permission
Sign in with an administrator account or run the installer with administrator permission. If the computer is managed by an organization, installation restrictions may require assistance from the system administrator.
Damaged or incomplete download
Delete the incomplete installer and download a fresh copy from the authorized source. Extract the new package completely before starting setup.
Windows requires a restart
Complete any pending Windows restart before running the installer again. Updates or a previous software installation can leave changes pending until Windows restarts.
Activation prompts keep appearing
Confirm that the installed Acrobat edition matches the supplied license and check the license status inside Acrobat. Verify the internet connection if online license verification is required. If the installation may be damaged, use the complete removal guide before performing a fresh installation.
Prefer a newer PDF editor? Compare Adobe Acrobat Pro 2024 or Adobe Acrobat Pro 2026 for Windows.


